Now that you get it, take a chance and head over to tiles.ice.org and try doing a tile! It's fun and addictive!
Jon
Tiles.ice.org
by Root88
This is tutorial illustrating a few efficient ways to make tiles. There are many other ways to create tiles of course, but hopefully tilers may pick up a few tips and tricks that will help them in the future. This is by no means a set of rules that must be followed, but by watching hundreds of artists tile for well over a year and a half, we've learned a lot of secrets and guidelines to making everything come together as a whole a lot more easily.
This tutorial assumes that you are using Photoshop 5 or greater. Other programs have been used to create fantastic tiles, such as Painter, The Gimp, and Paintshop Pro. Many artists use other programs to help create their tiles such as Illustrator, Freehand, 3D Studio max, Maya, etc., but normally those images would need to be pulled into a previously mentioned program and modified for seamless blending.
Here we go...
Prepare your tile for editing in Photoshop
Check out a tile and right click on the PNG version of the image and choose "Save picture as...". It is recommended that you always use PNG rather than JPEG because it is a lossless format. Not only will quality of your image be retained, it helps reduce minor blending issues that may occur due to compression.
The most important thing you must do is change the PNG from 16bits/channel to 8bits/channel. (Image>Mode>8 bits/channel) so you can use all of Photoshop's features. This problem occurs due to a bug in Photoshop, not the code of Tiles itself. The Tiles software generates an 8 bit PNG, but Photoshop reads it incorrectly. Other image editing programs such as the Gimp read the PNG correctly as 8 bits/channel.
Now save again as "[name]inwork.psd" (just in case you destroy your tile somehow and lose your Internet connection so you can't get it again from the webpage.
Making your selection
It is very important that you have made a proper selection in which to draw. Many times users select the area manually with the rectangular marquee tool in Photoshop and accidentally miss a row of pixels. This will wreak havoc on the flow of the quilt and all other tilers will hate you.
 |
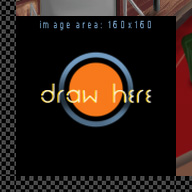
Create a new blank layer and choose the rectangular marquee tool. Now select "Fixed Size" for the style of the rectangular marquee tool and enter the dimensions of your tile area. In in this case, 160 X 160. Click anywhere on your blank layer and hit the following key combination. Alt+Backspace, Ctrl+X, Ctrl-V. This will cover the exact area where you should draw your artwork with whatever foreground color you have selected. |
 |
Making your selection even
better
This part is optional. If you have 4 neighboring borders to blend into (which is rare), you can skip this part, otherwise we recommend enlarging your selection over the blank edges. The area you draw on in the enlarged selection will not be a part of the final tile but drawing this way will greatly reduce blending problems. Many times when drawing in the exact area of your tile, a few edge pixels will fade out too quickly, especially if you are using a soft edged brush. It's not very noticeable when you draw your tile, but when it is added to the quilt it is blatantly obvious. Here is an example of a tile with bad edges.
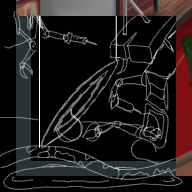
Duplicate the new layer that you just created (we will use the first layer for something later). Make sure you are still on the newest layer (Layer 2 unless you renamed it) and choose Select>Load Selection... When the window opens, ignore all the settings and just hit enter. Now hold down the Alt key and nudge your selection with an arrow key in a direction where you have a blank border until you cover the entire edge. Repeat the method again from the beginning for each blank border.
|
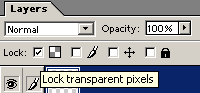
If you did everything correctly, you should now have something that looks similar to the tile to the right. Select the "lock transparent pixels" box in your layer window (see below) and you can now draw anywhere on your tile without covering your neighbors borders and creating a bad blend. This also means that you don't need to have the annoying "ants" run around your selection and you will be able to see the tile exactly as it will appear in the finished product.
|
 |
It sounds like a lot of extra work, but when you get used to the key combination, it is actually faster to make selections this way than manually zooming and and selecting.
DRAW ALREADY!
Use whatever works for you, but if you haven't any ideas to start, here's at least one way...
Make
a new blank layer on top of your tile area. Now you can sketch on top of what
was given to you. The layer will be deleted but you can play around with different
ideas here. It helps to force you to USE the borders given to you instead of
DODGING the borders given to you. Always try continue what you see, you can
even continue the colors given the entire way across your tile if you can work
it into your art. This is key for creating quilts that flow nicely over large
areas. In a perfect
area of a quilt, it is nearly impossible to tell where one tile ends and
the next tile starts. It might seem boring to continue someone else's
work, but it makes a great blend and usually you will be surprised and find
that what you thought you were blending was something else entirely. You can
always add your own bit of flare to the middle of your tile and the edges where
you have no neighboring borders.
 |
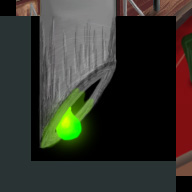
To sketch, use the paintbrush tool, with a single pixel, 100% pressure brush at 25% opacity. Start doodling on this layer. Whatever comes to mind based entirely on what your starting borders are. When you aren't sure if you like a tile, or you think you've come with with a better idea, hit Ctrl+A,Backspace and do ANOTHER one. Very often the first idea isn't the best idea. If you like, keep doing sketches on different layers until you have one that you think would be perfect and then go for it. Here the artist sketched about 3 strictly object oriented scenes and selected one that tried to use as many of the given elements in a single object. This is problematic when you have two or three things that are so well rendered like the wood on the top, the gray bar across the top, the solid red on the right, but with practice you will get it. You will also find that you learn new techniques to use in your own artwork by mimicking other artists textures. The artist tried to incorporate those solid elements into individual objects that interacted INSIDE his tile, and the tile to the left is what he came up with. |
The actual artwork (finally!)
Delete
any extra sketch layers that you don't need anymore. You can now go to the layer
under your sketch (the one with the locked transparency, probably named Layer
2) and start coloring. Since the layer above this one is probably mostly transparent,
you can draw right underneath it following the guidelines of your sketch. Lower
the transparency of the sketch layer if you are having troubles seeing what
you are doing. When you don't feel you need the sketch as a guide anymore, turn
off the layer's visibility, set the opacity to zero or just delete it.
|
Here is the end of the artist's first step of adding actual color to the locked layer. |
 |
| Happy with the first part, the artist moved on to the next thing that holds a challenge... the continuation of the wood from the top. The artist went ahead and used what looked like nails to drive them through the board, and tried to emulate the shading and texture of the given border (its much more fun to try to borrow a textured style from tiles around you than to just smear a few pixels over and then force your own style on it immediately). | 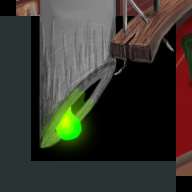 |
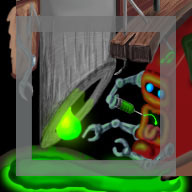
| With the board out of the way, the artist moved on to creating a little robot. He imagines that the pipe is a close-up of a needle, and that this robot feeds on this radioactive goop (and that the nail from the board has punctured his noggin, letting some of the goop slide out). He spent a little time getting the light from the goop in the giant pipe to reflect off his metal surface. | 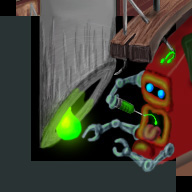 |
| Final step: touching up the foreground, and putting in a nice blend of color for a faded background, taking colors from the robot, the goop, the wood in the board, and mixing them around. The artist also added some shading to set the board apart from the pipe, and VIOLA! | 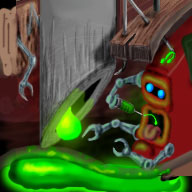 |
Making your tile enjoyable for others
Now
that you have created a beautiful piece of art with some help from another artists
borders, it's time to make sure you are giving the next person something interesting
to work with.
|
This is where you can use Layer 1 that we have been saving. It should be the square the shows the exact area of your artwork that will be used in the quilt. Drag this layer to the top of your layer list so that your artwork is blocked. Unlock the layer's transparency. Once again choose Select>Load Selection... and press enter. Now choose Select>Modify>Contract and enter the value of the border size of the tiles (you can see it on the main quilt page). Now hit delete and set the layer's transparency to 25-75%. Now you can see the exact edges that the person who checks out a tile next to you will work with. No need to modify your perfect tile too much, but this is your chance to give hints (or tricks!) to your neighbor. |
 |
|
General tips for making better quilts NEVER
take someone else's drawing or photo and put it in your tile. Don't
over use the clone tool or cut and paste. If you do use these for an effect,
try to modify the result slightly so it doesn't look repetitive and dull. Please don't sign your name on your tiles. The purpose is to have a collaboration of artwork, not to take credit of an area yourself. Try not to draw a horizontal or vertical
line the whole way across your tile. Even if your edges blend perfectly,
the tile will take away from the flow of the quilt when it is visible.
Don't continue a bad color or pattern from one edge to another. This basically means that if someone gives you a solid 15 pixels of BLACK or maybe a strip of clear blue sky or something, don't do the same thing to tiles on the other edges of your tile by continuing that all the way across. If you are given something you find difficult to work with, change it. Knowingly give adjacent tiles borders that would be FUN to blend off of. Giving them hints as to what is in the rest of your tile can be one strategy... or give them hints to something that isn't REMOTELY in your tile. Use
at least 1 element from every border you are given in YOUR tile in one
way or another. This doesn't mean you have to repeat something they have
in their 15 pixel strip over and over in your composition, but make reference
to it at least. |
Happy
Tiling!
-
Essobie (the artist in this tut) and Root88
Jump to Another Tutorial
Darth Maul by TonchyZ
Portrait by Mongi
Sky and Eyes by Gecko
Maya Tutorial One by DJ MonkeyBoy
How to make really awesome graphics by Greater Evil
Tigress by Leonardo
Happy Tree by Leonardo
Tiles.ice.org by Root88
Digital Inking and Coloring by TonchyZ
Maya Connections by Jamie McCarter
Wet Fruit by DeadGuido
Basic Vectors by DJ Monkeyboy
How to take super cool photographs! by Quantum-X
Landscape by Leonardo
Posts
new blood!
More tips!
We would love it if users would add their own tips and techniques by posting to this page. If any user would like to illustrate their tips, we can revise the tutorial and add any graphics and ideas that might be useful.
good stuff
i have learn alot. i find using the colour adjust on a selection makes tiles come to life with new colours and good blending. :D
My tips
A thing I have experenced myself from checking out tiles (and hopefully not by making any tiles like this myself) is:
Try not to blur the edges the borders you give too much. By that I mean, give solid and clean edges.
Also nothing is more frustrating than getting difficult textures from other people's borders. So try not to make any very complex and small textures. If you are going to have textures, then make them as easy to work with as possible.
An (maybe not that good) example of this can be seen one one of my tiles: Tile
The bottom border and top border were textures, but not too small, and thus nice to work with, while the right side border was trickier, and turned out rather odd on my tile.
Re: My tips
I think that continuing tough textures is one of the most fun parts about making tiles.
My tip
Even tho many disagree...
I think it's important to think about the flow of the quilt. Sometimes that means that you need to create a pretty empty tile. With empty I mean with no real content, just... background... Now, the tile itself might not become a cool masterpiece, but it will certainly add to the overall quality of the quilt.
I think it's important to think about the flow of the quilt. Sometimes that means that you need to create a pretty empty tile. With empty I mean with no real content, just... background... Now, the tile itself might not become a cool masterpiece, but it will certainly add to the overall quality of the quilt.
Anyone interested?
I made an action for photoshop (it was made in 7, I'm not sure if it will work in other versions) anyway, it's for the PNG format mainly, usually when I've opened it, it's been in 16bits per channel instead of 8bit, and that poses a problem, anyway, this action converts it to the proper format, then it selects the borders, copies them to their own layer, adds in a layer of black to cover the "draw here" part, and then it adds a new layer under the border, ready for drawing on.
[email protected] if you're interested in it. It's for the stock standard 160x160 (128x128 drawable) tiles.
I also set it up for a hotkey, F2 (could use anything you want really) and it streamlines the whole "Oh boy I have yet another tile I have to set up ready for work" process. :D
[email protected] if you're interested in it. It's for the stock standard 160x160 (128x128 drawable) tiles.
I also set it up for a hotkey, F2 (could use anything you want really) and it streamlines the whole "Oh boy I have yet another tile I have to set up ready for work" process. :D
Re: Anyone interested?
That sounds realy great..
If I get the time ill drop you a letter
this modem line I have is a real pain)...
-e
If I get the time ill drop you a letter
this modem line I have is a real pain)...
-e
Re: Anyone interested?
You could make the photoshop action ask for the tile size so it would work with all quilts, instead of just the standard ones.
Re: Re: Anyone interested?
And select just the needed area?.. hey, tell us! I've actually made such an action way before I've became skyfarmer, but it just does 16 > 8bit, 128x128selection, fill it with black, invert selection, copy&paste the selected area (that means putting borders on a new top layer), then create a new layer to draw on, and select the 5px brush. How is it possible to make it know the size and modify selection according to it?..
Re: Re: Re: Anyone interested?
wait, my action is the same thing as Mike's. hehehe
Re: Re: Re: Anyone interested?
You just set the selection size to input values. The user will type the size (doesn't need to be a sqaure) and photoshop can do the rest. The border size doesn't matter because the selection will be placed in the center of the tile where it needs to be. Users will still want to stretch out their selections to cover the blank borders (with alt-arrows) to make sure they send out clean edges.
Re: Re: Re: Re: Anyone interested?
Here is a link to my tile preparation action. It will create the selection for users to draw on as well as a layer called "Shared Borders" that will show the edges of the borders that neighbors will see.
http://root88.ice.org/tile_preparation.atn
http://root88.ice.org/tile_preparation.atn
Re: Re: Re: Re: Re: Anyone interested?
it's universal, but lacking automatedness. Entering the value each time... isn't it easier to make a set of actions for different sizes? changing just the selection bit. Of course, sizes may be whatever you gods think of, but I just hate pushing the same buttons over and over :)
Re: Re: Re: Re: Re: Re: Anyone interested?
No.