Darth Maul
by TonchyZ
Hello, and welcome to my first tutorial :) First of all, don't even bother to read if you just want to draw 'ultracool' without working like mad. Good art requires lots of work. Lots. It took me 9 months to get here, and I feel like I'm still on the beginning. Still many things to learn, way too many. Blah, smartass mode turned on... *click*... there. This is partially tutorial, but more an explanation how I did the pic. I believe you can learn a lot from this. At least I'll try to pass on my knowledge. All images here were done in Photshop 6.0.1 with a Wacom Graphire. Hrm, another digression, but I must; don't complain if you don't have a Wacom. A tablet doesn't make a good artist. A good artist can use any material and paint kickass stuff with it. No expensive thing can bypass the lack of general knowledge. Drawing with mouse only takes more time. (a good example is Petar Ivanchek, he uses only a mouse ).I had a reference photo here, but I did not trace it, or draw over it. You can copy the pic in the separate layer to see how much your pic looks like it, but I try not to do that, it really makes me more nervous. Off we go! (click on any of the pics to see it in full size)
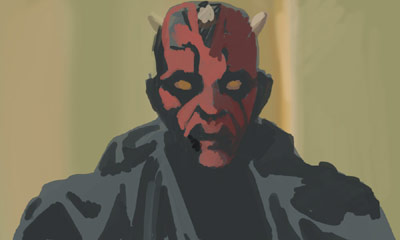 |
Blocking the main shapes. It needn't look nice, just to give you some material to start from. You should try to get the proportions, main values and colors right here. It's not too late to correct it later, but it's easier this way. Usually for this part I use paintbrush tool (B) with 100% opacity, brush dynamics / opacity set to stylus. Wet edges, of course, off. You might want to start the pic small, about 50% or 25% of the final pic size,do this step while it's small, and then punch it up to the full size. I worked in 1000x600 from the start here. Background was done with the large soft brushes, and the foreground loosely with hard-edged large brushes (specifically - 60px wide calligraphic brush, 35px and 19 px round brush). |
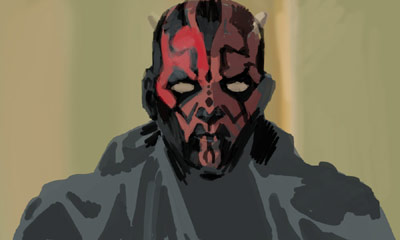 |
Ok. Now you should have a pic which looks good when you squint or blur it. It means you got the main shapes and values right. To find some mistakes, I suggest you flip the canvas horizontally. In my case, the pic looked totally skewed with lots of errors. It's useful to flip the pic occasionally while drawing, just because your "third eye" gets used to the errors over the time. When the big errors are fixed, you can start working with smaller brushes - here I used 5px and 9px wide round brushes. |
 |
Step three. The guy seemed fat so I stretched the pic a bit. Continued working with smaller brushes. Worked a bit on the right colours. Oh, don't forget - if he has a red makeup, it's not red! It has dozens of different variants of pink, orange, and other colors. The black makeup acts pretty much the same, only it reflects the surrounding colors more. I used cyan to do the lighter parts of the black makeup. |
 |
Another decrease in brush size. 5px, even 3 pixels wide round brush for adding nicer details. Worked a bit on the cloth. See, cloth wrinkles are one of the hardest things to do, and that's why I didn't start adding details on it until now. In my experience, everything comes out better if you don't complicate the things. Generally, don't start at one part of the pic and do it in tiny details with 1px wide brush (eyes for an example). What will happen? Three scenarios are possible (i'm speaking metaphorically, of course) :
|
 |
Step 5... 'tis starting to look better, huh? Used 9px brushes to add the horns, colors: bright brown and some desaturated browns too. That grey thingie is a start of the highlight. The face is pretty much finished here, all the main features done. The forehead highlight, above the eye, being a bit touched up. Changed the value of the left part of the background to make horn more contrasty. Proceedin' to... |
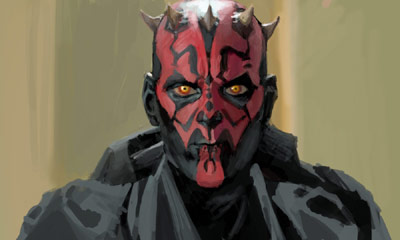 |
Step six! Added pink and purple (would you believe it?) to the horns, also some dark, dark browns and oranges. Added reflected light on the right side of the head. If you are not familiar with the term 'reflected light', find Ron Lemen's excellent tutorial on primary shapes. I think there's a link in the links section here. Anyway, started refining the clothes and touching up the face. Eyes were touched up a bit with a 1px wide brush. The paintbrush tool is at all times set to 100% opacity. For the gentler (sp?) highlights you might want to decrease it to 33%. Hmm, what else to say here... nothing, Iguess, gotta keep something for the next step. |
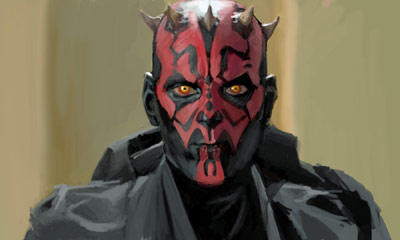 |
Finally finished the clothes. Didn't want to smudge it because I liked the rough look. Generally, smudging and smoothing seemed like a bad idea, the scribbly look of the face really impresses me. The pic is pretty much done now. You can desaturate the pic if the colors are too saturated, or you can desaturate only a part of the pic to emphasize a certain portion of it. And that's it. Picture finished. I hope you had fun reading this and I'd be very glad if you learned something. If you find the text dull, and you are bothered by the gramatical errors, please, be mild. My English isn't very good :) mhm, yes... the finished pic looks like this: |
 |
|
See you next time! p.s. Any questions, crits, comments, suggestions, flames, bombs, viral diseases... drop me in the mail :)
Jump to Another Tutorial
Darth Maul by TonchyZ
Portrait by Mongi
Sky and Eyes by Gecko
Maya Tutorial One by DJ MonkeyBoy
How to make really awesome graphics by Greater Evil
Tigress by Leonardo
Happy Tree by Leonardo
Tiles.ice.org by Root88
Digital Inking and Coloring by TonchyZ
Maya Connections by Jamie McCarter
Wet Fruit by DeadGuido
Basic Vectors by DJ Monkeyboy
How to take super cool photographs! by Quantum-X
Landscape by Leonardo
Posts
-woody
May I ask for how many hours you worked on this pic?
Ah well, enough with this blabber... I'm guessing chat is not why you made this forum, but that feedback is.
Btw, I would appreciate it if you would check out my razor piece I made just recently. It's at my devart account.
-Zlatko
Good stuff, hope to see some more stuff like that on the web
Nexflo
http://fnetonline.com
but only if you join my clan it's called PIAPAM
it stands for, Post Irrelevant Anoying Posts at Messageboards!
we have so much fun, we just search the internet for anything and nothing
then we post stupid messages such as "would you like to join my clan"-type of messages. IT'S SOOOOO MUCH FUN! I GURANTEE YOU!
feel da force young mastaah!