Basic Vectors
by DJ Monkeyboy
Basic Vector Tutorial (Illustrator CS)
by
DJ Monkeyboy
This tutorial will go over basic concepts and creation methods of making vector graphics. More complex stuff such as using mesh gradients to make photo real images will be for another day. Lets get started, first get Illustrator CS. If you have an older version you should still be able to follow.
|
Most people are used to raster graphics which is what your doing in programs such as photoshop. Raster images are made up of pixels, which are displayed on your monitor. Vector graphics on the other hand are made up of mathematical splines(curves), points, and fill color information. The bonus to using vector is that you can scale without any quality loss and you will have an overall clean look. And when I say scale I'm talking like whole side of a building, the only thing limiting you is the printer. Thus vector is great for things like logos, but can give a hand to any kind of design. With the latest vector tools you can even simulate raster like effects such as watercolor, but its still vector and scaleable! While your working you'll be looking at a quick raster representation of the vector artwork, so some things may look bad when zoomed out at high or odd %s. So if your final output is raster, paste your work or import into photoshop to see what the true result will be. Overall vector program previews are pretty good so don't worry about this too much, I'm just making sure you know the process of vector to raster. One can also turn raster into vector, but the overall process will typically abstract things and also a lesson for another day. |
|
|
|
|
|
Lets go over the photoshop esq tools real quick. Holding the space bar turns the HAND-pan tool on to move around the workspace. Pressing Z turns on the zoom tool, and if you hold ALT it changes to zoom out mode. Pressing enter seems to zoom to 100%. You can also change zoom at the bottom left of your screen. Pressing CTRL+Z will undo. |
|
|
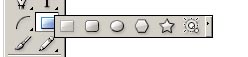
Ok goto your main toolbar, that thing to the left upper with double column of tool icons. Lets start basic with the rectangle tool, so click it the tool button with a rectangle in it. Now that you have that tool selected, goto your white workspace and first mouse button click and drag to see a shape form. Once you let go it will be created. If you just click the workspace and don't drag a box will come up so your can enter manual size to create your rectangle. Typically for art your going to drag create so lets go over the toggles. Standard drag and click will have the upper left start where you clicked and you can freely size. Now try this on a new rectangle but hold SHIFT as you drag and hold the mouse button. This will unify the scale so you'll only make squares. Now try holding ALT and do both these methods. Holding ALT will make the rectangle create from where you click and expand as if where you clicked was it's center. So if you hold ALT and SHIFT you'll create a rectangle from it's center and it will have a locked scale so you'll be making squares. |
|
 |
Assuming ya got that down, goto the toolbar again and now try clicking and holding the first mouse button
on the rectangle tool icon. The tool will expand to show other rad tools, so lets go the next one which is
the rounded rectangle tool. This will act a lot like the rectangle tool, but have rounded edges. To change
how round they will be just click on the workspace without holding and a dialog will come up for manual entry.
You can also do this in edit/preferences/general in the corner radius area(kinda the long route). Now as you
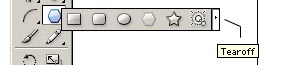
can see there are other tools such as the ellipse(circle) tool, polygon tool, and the wacky flare tool. To get
options for these tools do the first mouse click with no drag like we did for the rounded rectangle tool. To
more easily access any of these tools you can break off the set as a toolbar. To do this hold down whatever
tool is in the rectangle tool slot as if you were going to change tools and goto the thin far right side bar.
This is the tear off button. Which you can do for most these tool sets. Any toolbar icon with a dot in the bottom
right of the icon means it can be expanded to show other tools, thus it can also be torn off and moved around. |
|
Now that you've done that go ahead and goto the toolset to the left, the line tools. It just looks like a 45 degree line.
Play around with these tools with what you have just learned. When using the line tool SHIFT will snap your angle creation
in 45-degree increments. |
|
|
A stroke is how thick the line is(if any) and a fill is what color is inside(if any). |
|

|
If perhaps you've cluttered your screen select the BLACK ARROW tool and drag select over items you want
to get rid of then hit the delete key. Leave one surviving simple shape or make a new one if you had a
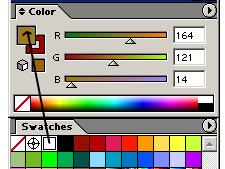
little vector holocaust. Making sure a object is selected, look at the APPERANCE tool window and you
should see the stroke and fill display. You can click on either stroke or the fill text to determine
what you will change. Most likely you have a shape with no fill and a thin 1pt black stroke. The icon
of white box with a red diagonal line means none BTW. Now I know I hyped up this appearance window,
but the easiest way for me to change stroke and fill is to drop it in the stroke/fill selector in the
color panel. Note you wont see the stoke/fill selector unless you expanded options like I told you to..
The square is for fill and the square with a hole is the stroke. Click one to make it ontop and active
then you can goto the color and swatch window areas and click on things to do color changes. You can also
drag the swatches onto the object or the fill/stroke boxes on the color panel. Note when dragging to the
toolbar boxes, you won't see color changes if you don't have you object selected. There is also stroke/fill
selector near the bottom of the main toolbar The lil curved double arrow near the fill/stroke selection boxes
will swap fill and stroke settings. |
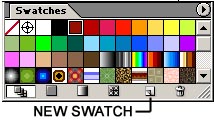  |
With that learned, play with changing the fill of a square or shape. Select the object then make sure fill box
is ontop in the color panel. You can press the key X to toggle between fill and stroke modes. By default you're
in RGB color selection mode but by clicking the upper right arrow of color panel you can access options to change
color modes. If you find a color you like and wish to use later you can goto the swatch panel and click the lil grey
new swatch button at the bottom right-ish of the swatch panel. While you're here also try dragging a swatch color to
your object or to the color box in color panel to change you're object's color. One can also have nothing selected and
make a color in the color panel to then drag the swatch over to an object. |
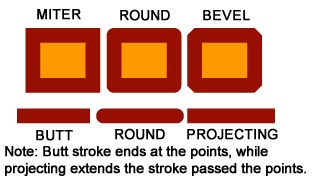 |
Now to actually change the size and look of the stroke select your object then look at the Stroke Window/Tab which should
be on the right side of your screen. Here you can change stroke thickness and if you expanded options like I told you too,
you can also adjust the stroke edges. The butt cap, round cap, project cap lil buttons in stroke panel let you change the
ends of open objects like lines and splines. The miter join, round join, and bevel join lil buttons are for changing the
stroke joins on objects that are closed like squares and stars etc� Play around with these on a semi thick stroke to see
their affects easily. Also feel free to dare the dashed line checkbox here while in the stroke panel. To change the color
of your stroke its just like your learned with fills, but make sure your in stroke mode which means the stroke icon in the
color panel will be on top (same icons are also shown near bottom of main toolbar on the left of the screen). |
|
|
|
|
These are a bit harder than they need to be. If you have an object selected then try the gradient tool you'll notice it
doesn't do too much. You will first need to apply a gradient swatch. One can drag over a pre-made swatch, but to make one
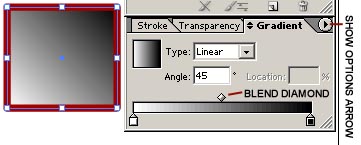
select your object then goto the gradient panel (its next to stroke and transparency tabs). Be sure to expand the options
with that damn upper right lil black arrow. With object still selected, the gradient tab is fairly blank so for type pick
linear. Now you can use the gradient tool, which is very similar to photoshop version. With it you determine angle and start
and stop point of the gradient. You can determine angle manually back in the gradient tab, but more importantly this is where
you change color and blending. The upper diamond on the gradient bar changes the blending. The colors at the bottom decide the
color and can also be dragged for blending. You can drag swatches onto these gradient colors to change them or you can select
a gradient color then change it in the color panel. NOTE if you select a gradient color then click on a swatch you will lose
your gradient totally, probably not what you want. Play around with moving the swatch colors and the blending diamond. To add
even more colors click where you'd like it to appear under the gradient slider and one will be created. A blending diamond
will also be created. If you want to delete a gradient color you have to select and drag it DOWN out of the gradient panel.
Help file says "To delete an intermediate color, drag the square off the gradient slider." Which is a damn lie, it has to be
down. To save a gradient you just made, click the new swatch button on the swatch panel. Knowing all of this, try now the radial
type. Also remember gradients can be adjusted further with the gradient tool. |
|
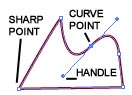
Now lets get to the real beef of vector, spline control. Click on the fountain pen looking icon in the main tool bar or press P to select the PEN tool. We're going to use the other tools in this area so click and hold on the pen tool icon to expand the tool selection then go ahead and click the tear button so they are all easy to access. With the PEN tool now selected play around in your work area by clicking to create points and also click-hold while dragging to create curves. Press CTRL click to stop or pick the black arrow tool. As hopefully you have seen, if you just click you make sharp points, but if you click-hold then drag you create curve points. Try making a shape that is closed like a funky rectangle. When you're about to close you'll see a ity bity circle appear to the bottom right of your cursor which says "your about to close your object". While making these lines you might have a funky fill color on confusing you; if so tell your fill color to be nothing which is the white swatch with a red diagonal line in it. With your funky rectangle or shape selected and still on the PEN tool you can also add and delete points. If you click on a line it will add a point and if you click on a point it will delete it. You'll see little + and - icons next to your cursor when pointing on right place of the object. NOTE its easy to miss thin lines when adding and you end up making some random bastard point which wont be apart of your shape, watch out for this. To avoid this you can goto the next tool which is the Pen + tool with will only add points, and will only let you do it to the object selected. For the Pen - tool this is also the case, but it is made to delete points. |
|
|
Getting a little deeper, as you've noticed the black arrow tool selects the whole object. If you pick the next tool over, the white arrow
tool, this selects and edits parts of objects such as the points and the spline handles. Click selecting sucks pretty bad with this tool
so get ready to do a lot of drag selecting. Drag select over one or more points on some of your shapes and as you'll see it will show spline
handles. Use the white pen tool to click-hold and drag move handles to adjust curve points. For more options we need to go to the pen set
of tools again and pick the thin arrow looking icon, the "convert anchor point tool" Nice short name eh? Anyway with this tool if you click-hold drag on a handle, the other one wont move. This is to make more specific sharp or curved shapes. If you click a point with this convert tool it will get rid of the handles and make the point full sharp. If you click-hold and drag on a point you will re-create the curves for the point. At this point you've probably miss clicked a lot of points or handles and gotten some lame error messages. I recommend you turn them off if you have ILL CS, others with lower versions can thank adobe for a retarded error msg popup. A way to help you is to turn on View/Smart Guides (CTRL+U). This way labels will come up when you are over certain parts of objects. The degree snap might be distracting so to turn this off goto edit/preferences/smart guides and then turn off construction guides and transform tools. |
Now most the time you can get a lot done like this, but the way to get a point to truly only have one handle is BULLSHIT. From what I
can tell there is only one way to do this on purpose. While creating points with the original PEN tool, after you make a sharp point,
click-hold drag on the same point to make it a 1-handle curve point. |
|
|
Perhaps your getting into multiple objects so lets go over selection we've learned and expand further. Hopefully you remember the black arrow tool (selection tool V) is the main object selector. Its selects whole objects. After you have some objects selected, click-hold drag to move them around. As you might have already noticed, once you select something, blue transform lines come up. Use the blue points to scale, and if you move a little past the points your cursor shows that you're in rotate mode. The white arrow tool, (direct selection tool A) is mostly for selection components such as points of an object and adjusting/moving them. For both these tools if you hold ALT+click-hold drag you will be copying and moving objects you had selected. Holding SHIFT is a when on these tools is a selection toggle. It adds objects that weren't a part of the selection and de-selects them if you already had them selected. There is also the lasso selection tool, which is a little more photoshop like. You click-hold drag to select and holding SHIFT puts you in add mode and holding ALT puts you in deselect mode. It's a little more control than the SHIFT only toggle mode. You'll use it less, but there also is the magic wand tool. It picks objects of same appearance settings. To determine which ones, such as fill and stroke, double click on the tool icon to get the options to pop up. Note you'll need to expand the options again clicking the upper right arror to get full options. After you select things with any of these tools play around with moving them around. Holding shift will lock to 45-degree helpers, and holding alt will duplicate objects. Just in case you're a little confused, first make your selection then click-hold drag them, then try the toggles if you wish. During these selection tools you can also "nudge" them with the arrow keys. This is nice for lil adjustments, if you need more control goto edit/preferences/general and change the keyboard increment. |
|
|
Let's get into other ways to edit your shapes. Tear off the scissors toolset on the main toolbar so you can choose both scissors and knife tool. Make or select a rectangle and turn on the scissors tool. To use this you are basically making points of a cut on the lines. So click somewhere on the top line of the rectangle then the bottom line and you have made a cut. Note you have to actually click the line (which should be highlighted blue) or you'll get a janky error msg. After you cut you can now move the pieces away from each other. One might notice the stroke is broken, if you wish to close the objects select then choose the main PEN tool. Click on each endpoint to close the gap. The first click will show a - icon, but when you click nothing will happen. The next point will show a circle icon and will close the object when you click. Another way is to select both endpoints with white arrow tool, then goto object/path/join (CTRL+J). The knife tool is similar but you use it like a brush. Select your object to cut, then be on the knife tool. Click-hold-drag to make knife like cut. The knife tool seems to auto close the cut objects for you, bonus. Although the built in object transform tools are pretty good, you can get some more options with the other transform tools. Scale tool is a bit redundant, but you can double click the tool icon to type in some manual amounts. Same for the rotate tool, yet you need to be on the rotate tool to move the lil axis tool in the middle. It does not show up in the default black arrow tool transform controls. The free transform tool may look crappy/redundant offhand, but it's toggles let you distort. Select an object and be sure to select the free transform tool (not to be confused with scale tool). Click-hold-drag on one of the corner transform blue points and then hold CTRL. This will put you in a photoshop style distort mode. You can also do this on non corner transform points holding CTRL+SHIFT to get a skew effect. To be in full on skew mode do the same actions but hold CTRL+ALT. To go in perspective distort mode, hold CTRL+ALT+SHIFT all together. While we're here check out the nearby warp tool (looks like finger smudge icon). Its like painting distortion, pretty rad. Be sure to double click the tool icon to see all the options/adjustments. Moving on to booleans which illustrator colorfully calls the pathfinder tools, we get into add, subtract, and divide tools. This will painfully also make me explain compound objects and layers. So make sure ya got your pathfinder window up. If ya accidentally closed it got window/pathfinder. Now make 2 objects making sure they intersect (one is ontop of the other). In the pathfinder panel click the add to shape area (first upper left) icon. This will make a union, aka put them together to make one. Undo that with CTRL+Z then try the next icon, the subtract button. This will subtract whatever is on top from the bottom. RANT: I dunno why the hell they took out the 2 separate buttons of subtract from bottom and subtract from top. It was convenient in older versions, o well gone since ILL 10 from what I can tell. So anyway we are stuck with this one dumb button instead of 2. Play with the other pathfinder tools for other options like intersect and divide. Sorry to confuse, but lets jump back to the subtract function to play with a little post work. So after you do a subtract function you'll see the gone object still is displayed in blue points and highlights. Pick the white arrow tool and you can move the visible object or the subtracted one to edit the final shape. To finalize your shape goto object/expand appearance, or if your feeling you don't want this compound shape crap to being with hold ALT when you do the pathfinder/booleans commands. |
|
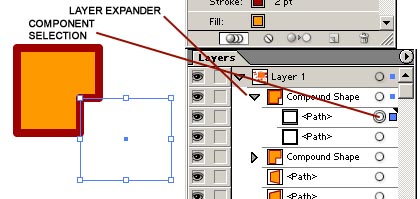
Although I'm mostly an arrange man myself, layers can be very helpful. In relation to what we just went over, they can be useful to move around and select parts of compound shapes. Select a compound shape, just in case your confused a compound shape is a shape that had a pathfinder operation on it. Now it will display the compound shape highlighted in the layers panel. Click the arrow to the left of the Compound text to expand the contents of the shape. Here you can select the circle to the right of the "path" text to select parts of the compound shape. Now you can move them around if you wish, but a real cool thing is that you can drag the actual path text layer bar around to re-order the compound shape. So say I take the lower path layer and drag it to the top of the compound shape layer list, I changed which object got subtracted from which. Now before you go ape shit in layers you can do a lot on 1 layer with the arrange function. Every item has a place on the layer from back to front. So if you want to change whether something is on top or on the bottom select the object then goto object/arrange/ and then choose what you need. Remembering all those quick keys there helps a lot. While you're there also note that's where you set objects to different layers with the object/arrange/set to current layer function. So an example use would be make a new layer, highlight it in the layer panel. Then select the object and tell it "set to current layer." Main offhand uses for layers is quick on/off visibility, locking(making unable to select), and selection. The eyeball layer icon is visibility, the box toggles locking on/off, and the circle to the right is selection. You can get into more complex layer functions by checking out the upper right options arrow on the layer panel. |
|
You may have found yourself wanting more control of the stroke. To do this select the object, then goto object/path/outline stroke. The stroke now is an actual editable shape. Also to expand shapes in a stroke like fashion, try object/path/offset path. This is good for if you want solid shapes to simulate strokes. An example is you have one shape then copy it behind with CTRL+B. Then do the offset path function. This makes this offset path a lot easier to select and change than if you copy pasted the object and changed only the normal stroke(can't select objects by clicking their stroke). |
|
|
The are a lot of neat filters and adjusters, but here are a couple I like to use a lot. Say you rotate and transform an object a bunch but then you just want the default transform box reset instead of being all cawk-eye'd. Have the object selected then goto object/transform/reset bounding box. The round edges tool is pretty cool. It takes the theory a rectangle changed into a rounded rectangle, but can be applied to any object. Select an object you want the corners rounded on and goto Effects/stylize/rounded corners. The preview function is helpful. This oddly is also in filters/stylize/round corners but doesn't have the preview function, WTF all I got to say. To adjust colors in a photoshop way check out filters/colors/adjust colors. Turn the preview on and play around with it. Very cool for adjust many objects of different color at once. If your unable to do anything, such as if you have color objects and change to grayscale mode, click the convert box on. On a different note the eyedropper tool (I) can be useful. By default its used to select an object then can use the eyedropper tool to click on other objects to apply their fill or stroke to the originally selected object. Double click on the eyedropper tool icon for a fist full of options. A ruler can be helpful at times and can be turned on in view/show rulers. To change what units it displays goto edit/preferences/units and display. Change general to change the ruler. To move where the ruler starts at 0, click-hold-drag on the upper left corner box of the ruler. It's a white square with nothing in it. To hide the starting workspace black thin rectangle, goto view/hide artboard. This can be helpful when your just making stuff and don't care about print space. |
|
|
|
|
Jump to Another Tutorial
Darth Maul by TonchyZ
Portrait by Mongi
Sky and Eyes by Gecko
Maya Tutorial One by DJ MonkeyBoy
How to make really awesome graphics by Greater Evil
Tigress by Leonardo
Happy Tree by Leonardo
Tiles.ice.org by Root88
Digital Inking and Coloring by TonchyZ
Maya Connections by Jamie McCarter
Wet Fruit by DeadGuido
Basic Vectors by DJ Monkeyboy
How to take super cool photographs! by Quantum-X
Landscape by Leonardo
Posts
muki ki
If perhaps someone would be kind enough to host, I have made some easier to understand video version of this tutorial. It is in sections and totals 80megs, but not bad considering its 40min at 800x600.
test
yer ill host if you like
my contact [email protected] (msn)
my contact [email protected] (msn)