I know you're off skiing, but erm, great tutorial. Maybe I should study it a bit more (as well as your other fantastic tutorials) so I can learn to draw again. Or maybe I should just stick to coding :)
Jon
Portrait
by Mongi
Portrait
Tutorial - Step by Step!
by Patrick Liu aka Mongi
2001
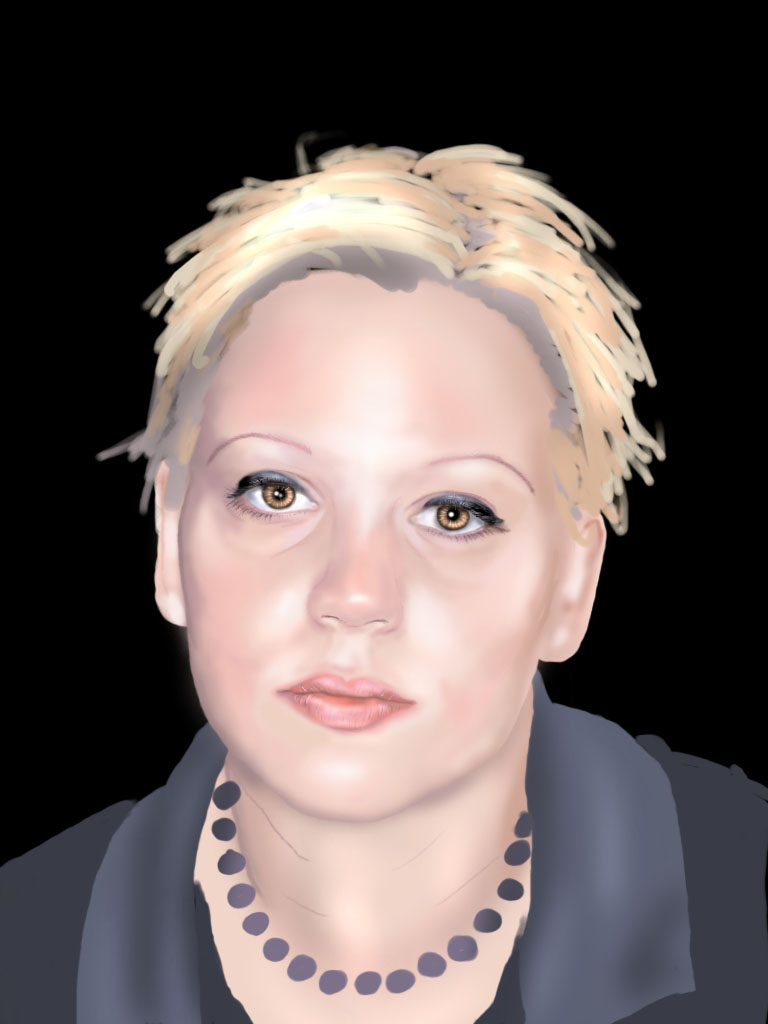
This shows how to draw a basic portrait in Photoshop. There are many ways
to draw a face, and this is how I work in PS, but there surely are better
ways to do it. This example is a face with full frontal light, though I have
added shades and highlight where there shouldn't be any to make the face more
alive. Certain details of the face are described in some other tutorials I
have written. This tutorial is more explanation of anatomy and drawing a face
rather than how the tools work in Photoshop, so I assume you are familiar
with the tools in Photoshop.
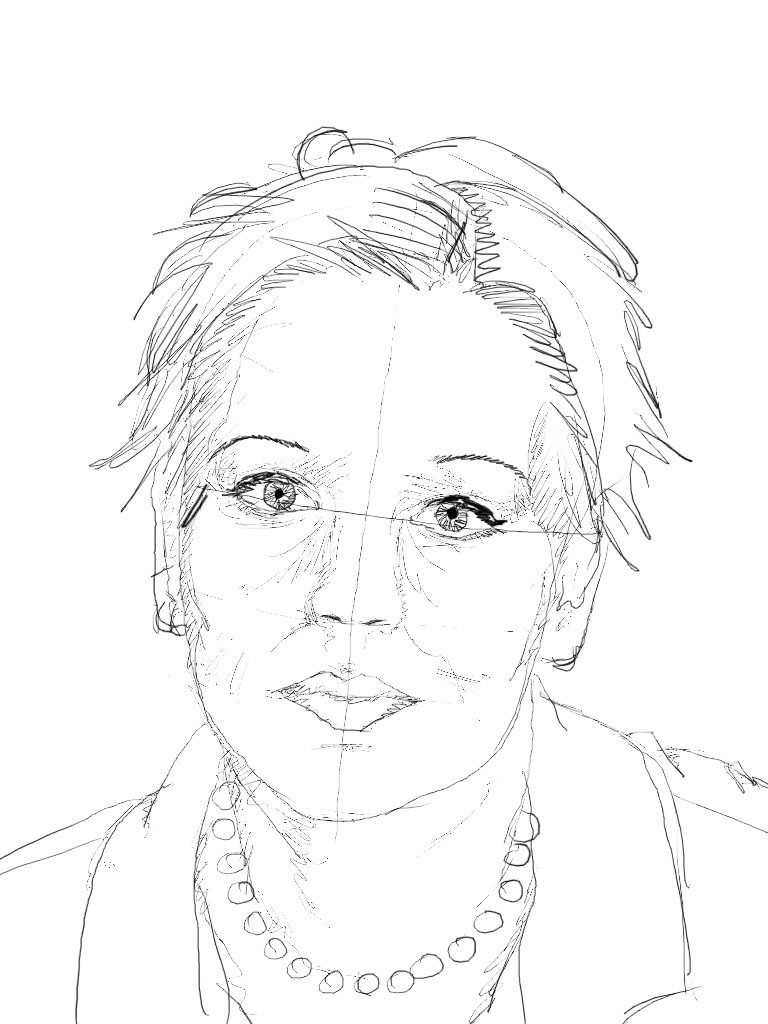 |
1. First the sketch. Now you have to be able to draw a face in the first places. Eyes should be in the middle of the head, many tend to draw them too high. The space between the eyes, nose, lips and the end of the face are about equal. Don't forget the ears! Think if the hair as big shapes instead of strands, it makes it a lot easier to sketch then. Make a couple of bigger sections of hair. Make rough shading, marking the major shadows. * It's a lot harder to sketch with a Wacom than with
real pen and paper, but then you can have it on a seperate
transparent layer. Do as you want. |
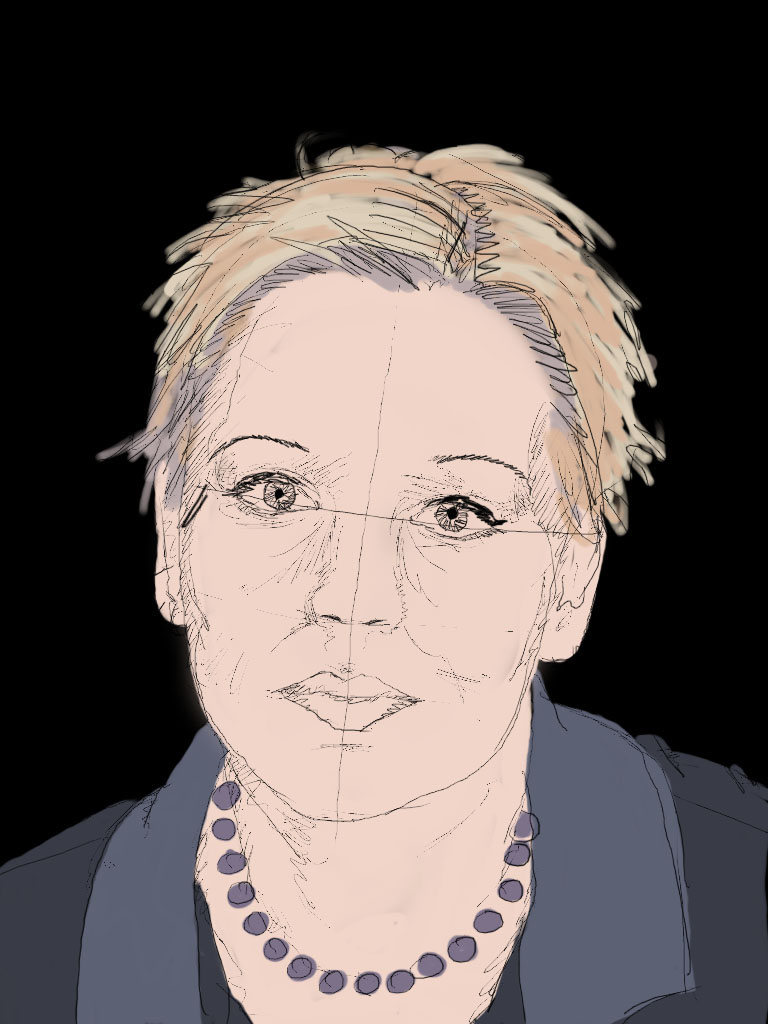 |
2. Now you can either put the sketch as the
top layer or use Multiply layers (depending on if you have
used a transparent layer). Have the background as the bottom
layer, and think of what you want in the background because
this might affect your shading later. Draw the basic colour
and shape of everything to have a clear view of how it will
be. Recommended seperate layers, in this order with hair as
the top layer: Lock the layer opacity to keep the shapes intact, except for the hair. |
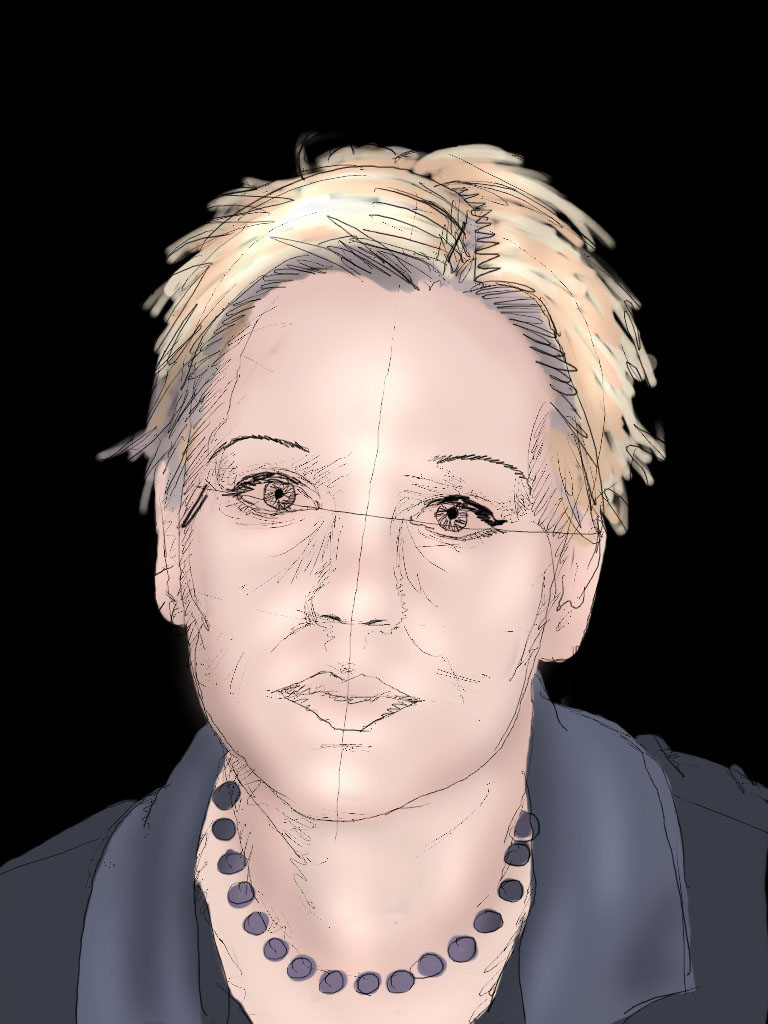 |
3. Begin with rough shading and highlighting everything.
Use the sketch and the model/photo as reference. See that the proportions
are right and the shades are placed right. You don't have to think of
what shade it is right now. Some key areas: * Highlights: forehead, eyebrows, a bit beneath the eyes, cheeks, nose, chin, middle of neck. * Shadows: around the eyes, sides of face, nose, sides of neck, contours. Have a good look at the screenshots. |
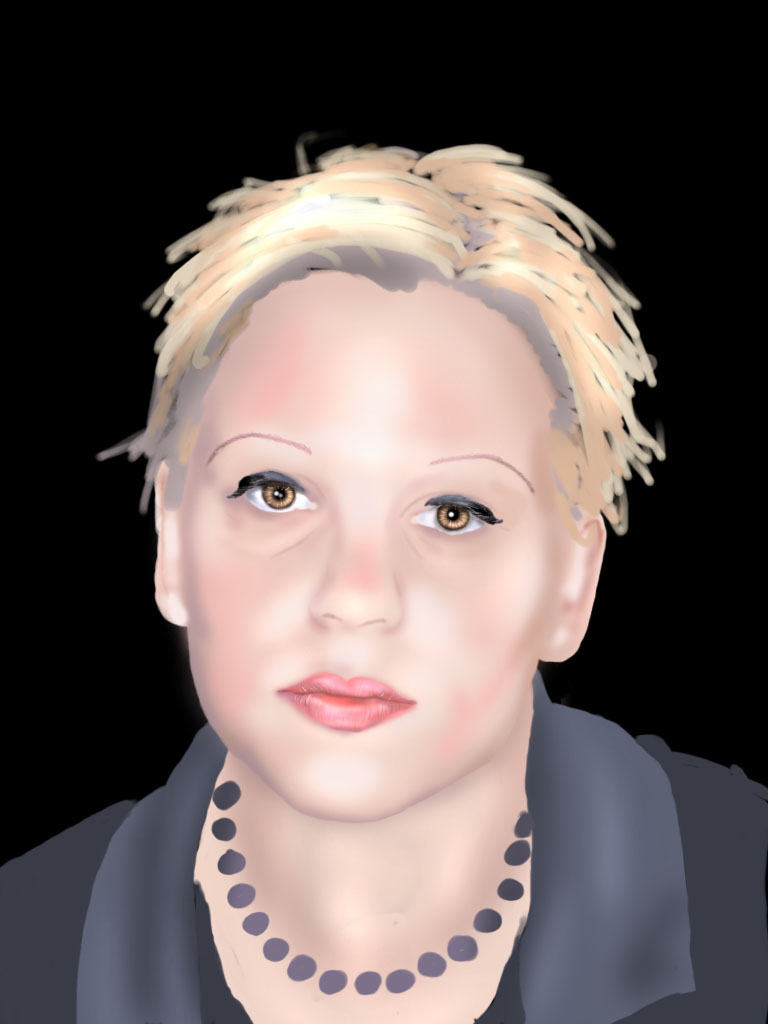 |
4. Begin adding features such as eyes, eyebrows, nose and lips. Draw the eyes, eyebrows and lips in a seperate layer (see other tutorials). The eyebrows should be done about the same ways as hair (tutorial) but a lot simpler of course. Shade the face and ears even more. Try using the brush as much as possible for now, and not the burn/dodge tools. Add a couple of different shades and colours, e.g. some part of the face are redder. |
 |
5. Even more shading! Put in the stronger lines, such as under the eyes and the edges of the face (cheekbones). Don't be afraid to add strong highlights/shadows, that's what makes a good colouring. And try using as many different shades as possible. Use as large brushes as possible, and big strokes to make it smooth. Finalize as much as possible now. |
 |
6. Now work on the hair. Try making it blend into the skin at the forehead. Use about the same colour and blur it a bit. May be fine tuning the face around the hair. |
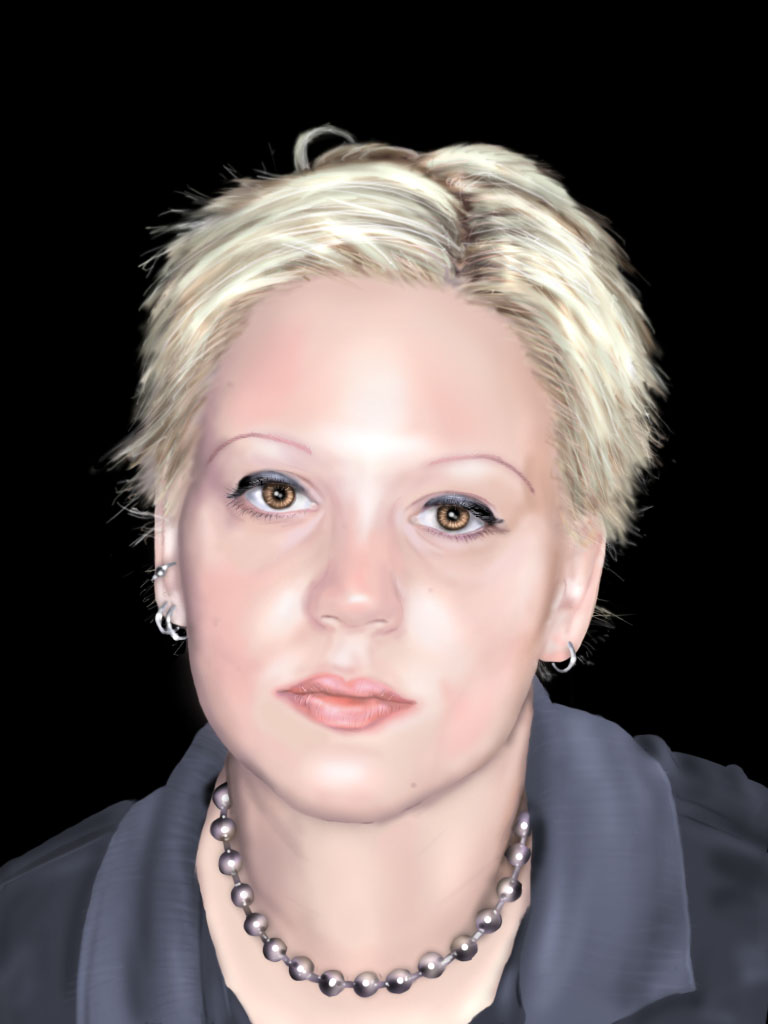 |
7. Shading the neck and clothes, just the same way as the face. Notice that the neck is shaded in many places, by the head, clothes and necklace. Clothes are often quite diffiicult with all the wrinkles and textures, but that's a completely different tutorial! Add earrings. Shade beneath the earrings. Add other small things, e.g. 'mouche', spots and pimples etc. |
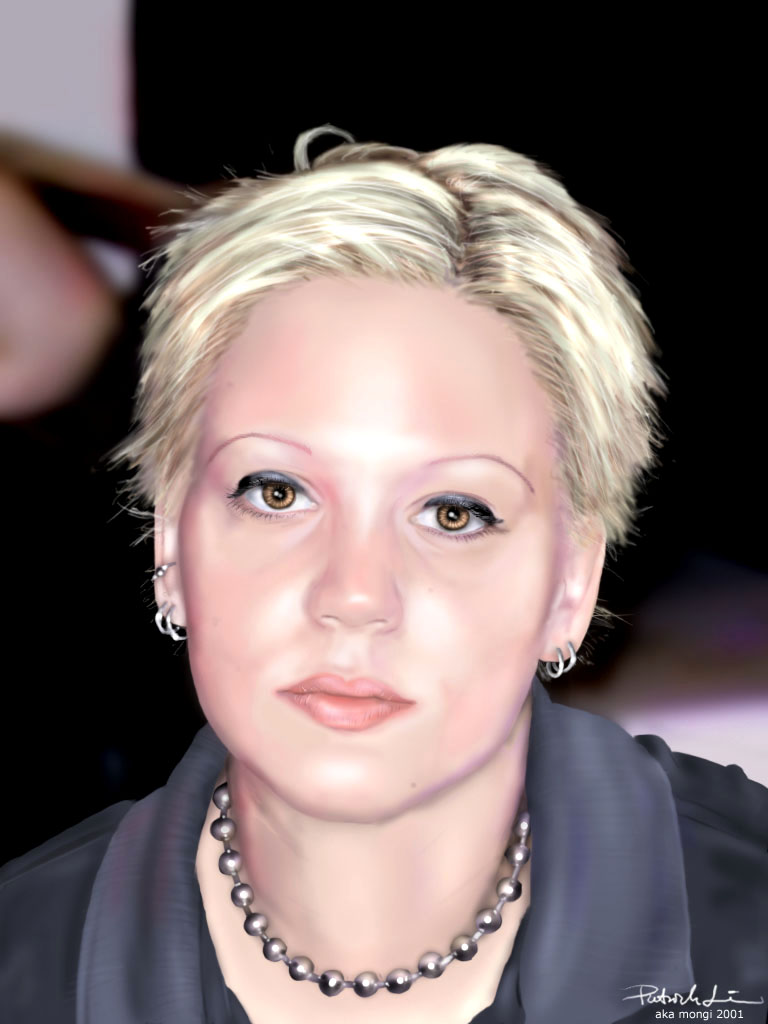 |
8. Add the background. In a portrait you want to focus on the face, but the background could be very detailed too, just not in this example. If you'd like to you could add additional coloured shading to make it more alive (see screenshot). Have them on a seperate layer in case you change your mind. To have more intense colours you can finalize by flattening the pic and adjusting brightness/contrast. You can always alter the shading according to your taste, as long as it looks good. You don't have to draw EXACTLY like the model. For example to accentuate a certain feature you can make stronger shading and vice versa. I almost always make eye a lot lighter than they are because it looks good. The hair is impossible to draw exactly like it is, but you can make up some so it looks good. |
See you next time! p.s. Any questions, crits, comments, suggestions, flames, bombs, viral diseases... drop me in the mail :)
Jump to Another Tutorial
Darth Maul by TonchyZ
Portrait by Mongi
Sky and Eyes by Gecko
Maya Tutorial One by DJ MonkeyBoy
How to make really awesome graphics by Greater Evil
Tigress by Leonardo
Happy Tree by Leonardo
Tiles.ice.org by Root88
Digital Inking and Coloring by TonchyZ
Maya Connections by Jamie McCarter
Wet Fruit by DeadGuido
Basic Vectors by DJ Monkeyboy
How to take super cool photographs! by Quantum-X
Landscape by Leonardo
Posts
Hey Mongi
Tut
It's nice to see a different approach to a similar subject. I think we all learned a lot from Mongi and TonchyZ's tutorials.
yep
always good to see (and try) different techniques.
jeez
at first i thought that was rendered! so cool...
A-D-M-I-R-A-B-L-E!
What a GOOD tutorial,Mongi! Clear, easy-to-learn, original... It´s my first visit to ICE, but I´ll keep around here!
PD: By the way, who´s the model?
¡Sigan así, chabones!
PD: By the way, who´s the model?
¡Sigan así, chabones!
ack!
Mongi pointed out today that the last thumbnail/image was the same as the previous step. I have it fixed now, so you can see the background he added. Ack!
Jon
Jon
Bad light
Portraits are about capturing more than a likeness. This piece reads like a polaroid, with glassy, dead on reflections making this potentially interesting woman more like a false, plastic object than a human study. I suppose it was done from a polaroid, though.
There is a lot of skill in the work, but not expertise.
There is a lot of skill in the work, but not expertise.
That's incredible....
However, i don't understand: when did the sketch lines "dissapear"? Did you reduce the opacity once you had the basic shapes of everything?...
sorry to bother you.
Your person is wonderful 0_o I thought the thumbnails were photos that you were showing how to edit until the end.... ~_~
sorry to bother you.
Your person is wonderful 0_o I thought the thumbnails were photos that you were showing how to edit until the end.... ~_~
::.YagO.::
Felicitaciones por sus tutoriales, me han servido mucho para iniciar en esto del dibujo digital.
Gracias, por compartir sus conocimientos con los demas!
Gracias, por compartir sus conocimientos con los demas!
More Power to your Elbow
Hi,
My name is Godfrey from Nigeria, I'm a registered member of ICE, and I want to say I luv your work. It looks real.
Please if you can, give me a tutorial on how to make a portrait(drawing) on computer. Because this is my first time of getting to know something about making portrait on my computer set. I'm crazy to learn and hear from you.
Cheers and kudos to ICE World wide.
Bye,
Godfrey
Woot...
You are talented mate... :o
How about a basics of drawing tutorial? Im sure many of us will need it!
How about a basics of drawing tutorial? Im sure many of us will need it!
Questions!
Yes, this may be dumb, but I'm curious...
What size is it? You know, 1000 x 2000 px or something...
And how many pixels per inch? I don't know if that's what it's really called though... -_-'
What size is it? You know, 1000 x 2000 px or something...
And how many pixels per inch? I don't know if that's what it's really called though... -_-'