

Great tutorial.
Has anyone tried the free version of Maya yet?
Maya Tutorial One
by DJ MonkeyBoy
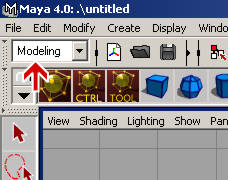
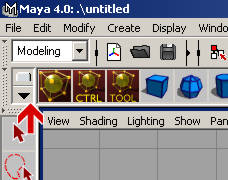
| First get maya running First time running setup: (make sure capslock is off this will mess all the hotkeys up) |
||
| Hold
down the spacebar in the middle of the screen click hotbox controls (still
holding spacebar) click show all. This will show all of our tools. The quick
way to pick tools is to hold spacebar and cycle through them in this "hotbox"
thing. However they are also at the very top of the screen. Now hit the
spacebar real quick(press and release) while the mouse is in the main screen
space. This will take you to the quad screen setup. Put the mouse on any
of those windows and hit spacebar again to maximize it. |
||
|
||
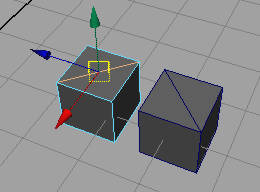
| K
lets make somethn wh00t! In the perspective View: Hold spacebar to open the hotbox and goto Create/polygon Primiatives/cube. By this time u might be like "what the hell are these boxes next items??" The boxes next to functions are options for them. If i click on cube the default cube is made, but if i click the box next to cube options come up so i can make a specific parameter cube. K so assuming u made a cube by now your probably like "what is this wireframe shit!?" So you press 5 to enable shadding in the window. Later you may want to go back to wireframe mode in which press 4 to do so. This can also be done by picking the shading you want under your window's shading menu (next to view and lighting). |
||
| Now basic mouse/view
movement: While holding alt and the first mouse button you rotate. While holding alt and the middle mouse button you PAN (left,right,up,down). And while holding alt and first mouse button AND middle mouse button you zoom in and out. Play with that real quick and assuming you'll get your camera in a nice wacked out position you can reset it by selecting an object, in this case your cube, and hit F this will put the camera on this item and zoom in = /<-rad. |
||
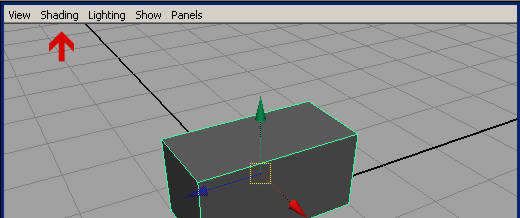
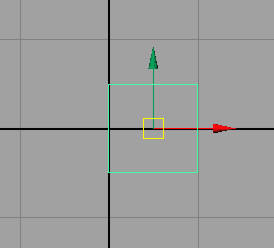
| Lets
play with the actual item!! muki ki! select the cube and press W This puts you in move mode. Now you can use the happy lil arrows to move based on an axis or click the middle (thin yellow box) to move around freely based on your window. Now hit E, this lets you rotate. The colored lines again are axis based and the yellow line is free rotate. Now click R this is scale. The usual, the sticking out colored boxes are axis based scaling and the yellow box in the middle is proportional scale. To resize the size of these tool displays press + or - . |
||
|
||
|
||
| Now lets get into moving
parts of our objects! select the cube and right click on it and you can see you can pick edge, vertex, face, (the others you'll learn later) Edge picks, well edges.. which are 2 connecting vertexes, vertex selects the single points that make the cube and face selects a whole face/side. Lets play around, go into vertex mode by selecting the object, press and hold the right mouse button drag to vertex and let go. Now you'll see the vertexes turned to purple dots so you can see them easier. Try selecting one and move it. Now select another one by holding shift and clicking on it or drag selecting. If you got more than you wanted you hold CTRL and select already selected items to deselect. This works the same for edges and faces. Now play with rotate and scale while you have 2 or more vertexes. When you want go back to just selecting the item and not a face or edge or whatever hit F8, note..you'll do this A LOT. After the 5min of playing your probably pissed you have to click on those dumb center dots when picking faces in face mode so lets turn that off. In hotbox goto Window/SettingsPreferences/Preferences Then goto Selection under Settings and on Polygon Selection click whole face. Click save at the bottom of that window. |
||
| Assuming
you have a nice deformed ass cube by now lets get into some basic tools. Goto face mode on your cube and select a face then goto your hotbox (holding spacebar) goto EditPolygons/subdivide. You'll see by default it quad divides. Now goto edge mode and select an edge or 2 on the subdivide you just made. Goto hotbox and goto EditPolygons/Delete edge. As you can see it kicked that edge's ass, but due to edges goin' bye bye the geomerty can change. Now subdivide another face and goto face mode and move stuff around. Now that we have more faces we can make a hot abstract blob wh00t! Goto Vertex mode and pick a random vertex and goto the hotbox Editpolygons/Delete Vertex. Now that some more geometry is on the screen you can check out other view options. Assuming your still in the perspective view goto Shading on the window and check out shading options xray and wireframe on shadded. These view options can come in handy. Select them again to turn them off. |
||
| Some other "helpers"
are snap tools. Pick a vertex and goto Top view window. (assuming your perspective
is maximized hit spacebar then hit spacebar ontop of the top view window)
In the upper middle there are the snap to grid and snap to point snap icons.
Snap to grid will snap the vertex or whatever you have selected to a point
on the grid and snap to point will snap to another vertex on your cube.
Play around with moving a vertex in each snap mode, its a little odd at
first but it comes in handy if you want to make something proportional real
quick. make sure and turn it off when your done using it. |
||
| With
the high chance your cube looks pretty crazy by now lets delete it by selecting
and hit the delete button. (make sure and be in the root of the item where
it has a green selection by hitting f8). Create another cube but hey we
keep doin this so lets make an icon in our neeto shelf. |
||
|
||
|
||
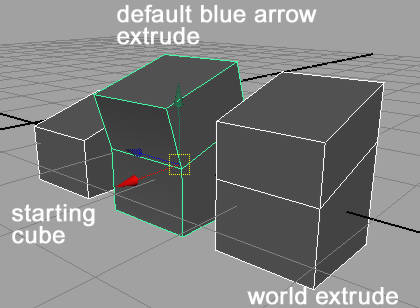
| The mighty extrudefunction!: A good style for beginers is the box modeling style which mostly deals with selecting faces and extruding. So pick a face on your new cube with perspective view maximized and goto hotbox EditPolygons/ExtrudeFace. Its highly reccomended u make this icon in your shelf. Now after you do it you'll see the extrude tool the blue arrow extrudes based on the normal of the face (where the face is facing) and the others are axis based. The blocks are for scaling. Lets keep it simple so move the blue arrow. As you can see it extruded the face so now we have double the cube we used to have. |
||
|
||
| Which we otta try now.
By default the extrude tool keeps faces apart which SUXXX so lets turn that
off. In the hotbox goto Polygons/ToolOptions and check on keep faces together.
So select 2 faces that touch eachother and extrude them play with the move,
scale, and rotate functions of the extrude tool. You can also jump to the
normal move,rotate,scale tool after you extrude by hitting W, E, or R. Now
select 2 faces not touching, such as ones on opposite sides and extrude
and play with it to see how things react. |
||
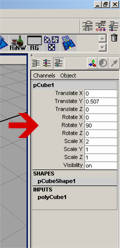
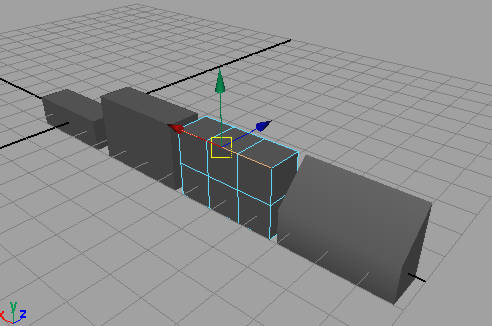
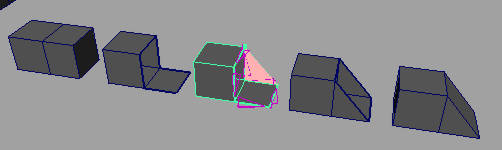
| Now
that we know extrude we can get into division basics. Starting with a new
cube one way to divide offhand is to select it and goto the channel box,
under this you'll see INPUTS polycube1 click on it and you'll see basic
parameters such as width but in this case we're looking at subdivision width,
height and depth. play with that real quick then set them all back to 1.
Lets say we want to make the cube look like 3 cubes together select 2 opposite
faces of the cube and extrude. While in extrude mode move the blue arrow
and you'll see under the channels box local translate Z moves, since the
cube is 1x1x1 we can set this to 1 so it extrudes by 1 thus making it look
like there are 3 cubes together. Now select all of one side (3 connecting
faces) and extrude that. As you can see your making neeto divisions. To
get slants one can extrude then delete an edge, see the example. |
||
|
||
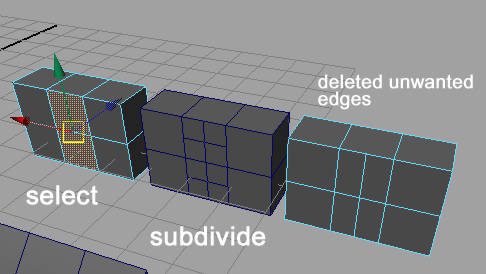
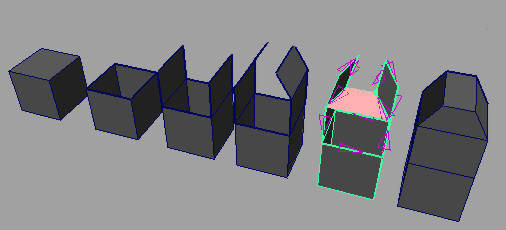
| Lets
get into more complex divisions. Offhand you may have found the split polygon
tool (EditPolygons/Split Polygon Tool) basically you pick face or faces
you want to divide goto the tool then make divisions by clicking on edges
and hit enter when done. I hate this damn thing since your eyen' everything
and its not exact. It is good for making quick divisions on organics to
where things don't need to be so exact. I prefer to use subdivide for making
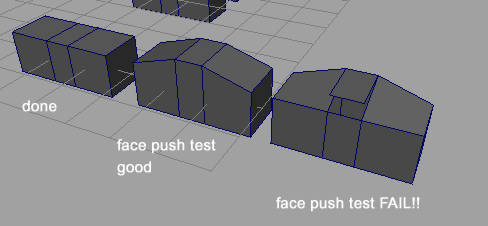
mid divisions. [[face-d1.jpg]] Lets say i want to divide in the center of my 3 cube thing real quick extrude would be painful so I pick 2 center faces and subdivide (EditPolygons/Subdivide) now it added some horizontal lines i didn't want so i pick them (total of 4) and do the delete edge function. Subdivide can also be used well on edges with the triangulate function. Lets go back to the final result of our last example and lets say we want to divide the top also. |
||
|
||
|
||
|
||
|
||
|
||
|
||
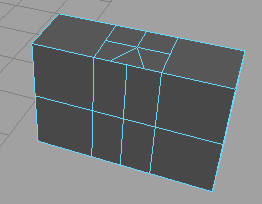
| First we want to make
some side triangles so click on the left edge then the lower edge and hit
enter. Do the same for the other side. The arrows on the edges show how
the normal will result so you want to go counterclockwise like i just told
you. now that we have 2 triangles we want to fill the hole so start somewhere
on an open edge and go counterclockwise till its full and press enter. Another
way to do this after we made the triangle sides is to select all the open
edges then goto (EditPolygons/Fill Hole). While using the append tool its
easy to screw up so if it happense just hit enter then CTRL-Z to undo and
try again. |
||
|
Although
I don't use it as much you may come across where you need to use extrude
edge. Start with a cube and delete the top face.
|
||
|
||
| Multiple
Object time, UH OH! Start a new scene so your space is nice and blank and
create a cube. Now press CTRL-D and it will duplicate that cube. (move it
since it will duplicate exactly on top) You'll notice your duplicate doesn't
have the input functions your original did, so if you want this control
goto your original cube: (Edit/Duplicate) click on the option box of duplicate.
Check on Duplicate input connections and apply. This will stay on till you
change it. Kay now delete all that crap again and make a cube and now goto
4 window mode. |
||
|
||
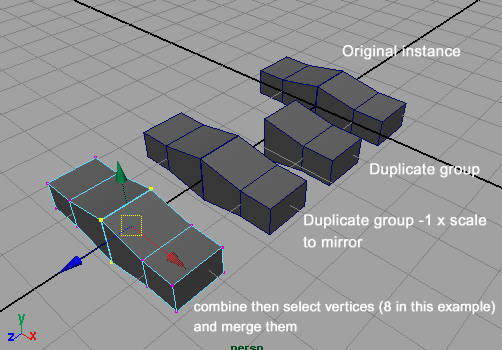
| Now
goto duplicate option box again; turn off duplicate input connections then
put scale at -1 for X (so scale is -1,1,1) and geometry type pick Instance
and click apply. When you group things the center pivot defaults to 0,0
so now that the cube was duplicated with negative X scale it makes a mirror.
Also since we have made an instance when we change any of the sides they
both do the same thing. So if you move vertexes or extrude or whatever it
will be the same on both sides, Half the work baybe!. If your working on
other things in your scene be sure and reset your duplicate options. You
don't always want to do negative scale dupes with instances. |
||
|
||
|
||
|
||
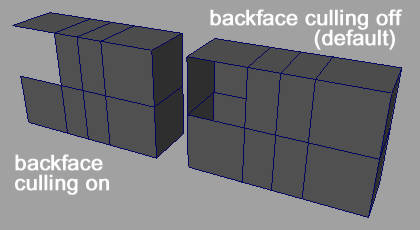
| Booleans
are another classic function. Which despite their old age continue to not
work 50% of the time on ANY program. Basicaly its the classic Union, Subtraction,
and Intersection. To do this select 2 objects and position them how you
want them to interact and goto (Polygons/Booleans) and choose which you
want. Union welds them together making 1 solid piece, subtraction takes
the first piece you selected and subtracts the second piece, and intersect
results in geometry of only where the 2 pieces went inside eachother. When
it actually works it can be helpful. |
||
| Other shapes: of course
we don't want to forget about cylinders and spheres. Both can be found under (Create/Polygon Primatives) typically the sphere default is very divided so select it after making and goto its inputs in the channels box and change the divisions as needed. The same can be applied to cylinders but also keep in mind they make good bases for N-gon shapes. Make a cyclinder and then under inputs N-gon = subdivisions Axis, Thus a pentagon = 5 Subdivisions Axis. Scale as needed. I also reccomend making subdivisions Caps 0 so the caps are easier to select. |
||
| Other
basics: After a lot of work on a model its history can really grow and slow you down. So when you like your items so far select them all then goto (Edit/Delete By Type/History) |
||
|
Normals, the edge type (yes the same word is used for face direction, bastards!) can also get pretty weird while heavily editing an object. Edge normals are how soft or hard they appear. In reality normals can only be hard or soft. Anything above 0 is soft and the more it is above 0 the more chance the angle will look smoothed.
I like to work in hard mode so i can see the faces easily so i set mine at about 20 you can do this at (EditPolygons/Normals/Soften-Harden) be sure and choose the option box. The higher it is the "softer" the edges look which can be good if u want to make a sphere or curve look smoother. 60ish is good for semisoft. Now the reason these are also called normals is because this soft vs hard look is determined by the direction of vertex normals.. So the angle is just the tolerance it gives faces sharing the selected edge. 40 means it will go soft if the angle between the 2 faces saharing the edge is less then 40 degrees.. if not it will go hard. Thus a higher normal looks softer since when viewed it has more chances to be soft. Edges appear hard or soft depending on how the face normals vary across the edge. If it's a soft edge it averages the face normals so that when shaded they appear to be facing the same direction. If it's a hard edge it sets the normals perpendicular to the face. If you just got totally confused basically to control how soft/hard edges look, goto (EditPolygons/Normals/Soften-Harden) You can pick the whole object or edges specifically. Tthe lower the # the harder it will look, the higher, the softer.
|
||
| If
you want to manually move your axis select the object then press the insert
button on your keyboard. Move it where u want then press insert again. |
||
| To get some decent
render settings (default BLOWS!) goto hotbox (Window/Rendering Editors/Render
Globals) Set resolution to 640x480 or higher and on anti aliasing quality
pick the 3d motion blur preset. Of course to see anything your gonna need some lights so add an ambient light or point light for some quick light. They can be further edited by selecting and changing things in channels or by selecting then pressing CTRL-A. Here u can change color and shadow stuff. |
||
|
||
| |
||
Jump to Another Tutorial
Darth Maul by TonchyZ
Portrait by Mongi
Sky and Eyes by Gecko
Maya Tutorial One by DJ MonkeyBoy
How to make really awesome graphics by Greater Evil
Tigress by Leonardo
Happy Tree by Leonardo
Tiles.ice.org by Root88
Digital Inking and Coloring by TonchyZ
Maya Connections by Jamie McCarter
Wet Fruit by DeadGuido
Basic Vectors by DJ Monkeyboy
How to take super cool photographs! by Quantum-X
Landscape by Leonardo
Posts
Tut
Re: Tut
Great. I need a free version of Maya.
Re: Tut
Yes I posted about maya 6.0 PLE today but not in a reply to you, you can read it at the forum, its at alias site if ya look around a sec youll find the freeware, watermarked and cant use maya files , PLE only, but i think everything else works.
Sarc
Sarc
Meep
I havne't tried the free Maya yet, but maybe someday. I think it's a smart thing for them to do since they know if people ever want to go pro with it they'll have to purchase the program.. but as long as they stay amateur they don't have to pay. Should get more people interested and learning it. I think all expensive softwares should do that. :) Anyway, there's an awful lot of work put into this tutorial for no one to comment on it. (I should know.) Good work. :)
nice tut
excellent tut MonkeyBoy, tho i just wish it was on 3DSMAX...
Re: nice tut
Yeah love the site and like gecko said its always good when people show their apreciation for all the hard work u put in ;)
great
I just wanna thank you for that cool tutorial.
Sweet :-)
Cool tutorial. I like the language, thought occasionally its hard to read...
You helped me out in the basic part of Maya 4.5 :-)
Thanks a bunch,
Nash
You helped me out in the basic part of Maya 4.5 :-)
Thanks a bunch,
Nash
moving handles
Good tutorial. I'm just starting off in maya 4.5
But this is driving me nuts, there's probably an easy answe but...
when I import an object, (.dxf or whatever) if I try to do a rotate the entire object is rotated in a huge arch -rather than just spun around like primatives are, how on earth to do move the handles?
But this is driving me nuts, there's probably an easy answe but...
when I import an object, (.dxf or whatever) if I try to do a rotate the entire object is rotated in a huge arch -rather than just spun around like primatives are, how on earth to do move the handles?
Re: moving handles
Pretty sure you just want to change your pivot. To center do Modify / Center Pivot function. Also when in move mode you can hit the INSERT key to move the pivot manually. Hit insert again when done to go back to normal move mode.
alan maya neophyte
Cheers for this tutorial it has really helped me with my polys, I hoping to find more easy to follow tutorials on your site as I Have just come back for more, Cheers Monkeyboy whoever you are, top draw tutorial.
Yah
Hah! This tut's krad! 3d stuff here I come! Thanks!@#$
-fat
-fat
Yah
Hah! This tut's krad! 3d stuff here I come! Thanks!@#$
-fat
-fat
Maya 6.0 PLE
Yes ive tried maya 6.0 the freeware PLE as its called, seems to work perfectly EXCEPT the following major let downs, you can not use PLE files in MAYA, or vise versa, possibly only PLE cant use maya files, but maya may be able to use PLE files, anyhow, and the big bummer, there is a hige annoying water mark in any of the shaded or rendered views that goes or seeps through everything, its on the model back round and floor, everywhere and its never blocked out by a 3d object. PLE is great to learn some things on, but final products are washed out with watermarks. I really wish they coulda just put a smaller water mark always in view instead of having it cover the whole viewning area, haha , then again nice of them to even make a freeware also...
Sarcophagus the Super Newbie...
Sarcophagus the Super Newbie...
Good tuto, good Maya PLE
just got Maya PLE 6 and is flawless. It is easy to get annoy'd by those damn watermarks (they are even OVER your work when rendering) but hey! it is FREE! is so fuck'n powerful, almost the pro version and so educational an' keeps being free! when did adobe d'that? or macromedia or any other of the big-esentials? I always prefer Alias software over the rest because it is obvious that they care for the designers, the customers, we pay or not.
Whatever, I was lookin' for tutos to start messing the world with my 'til warm mayaPLE but just couldn't find anything for my really newbie level. Finally I found this wonderful tuto, a kick in the ass for all the other tutos I found. Thankyou very muchas ChangoBoy! you saved my day and got a new artist in the room.
Now that I got the basics I've been makin' good & decent stuff and all started here =)